What Is Meant By A “Bank” Of Chilled Water Coils

For those that work with HVAC installations on a regular basis, you have run across the problem of needing to install new chilled water coils in very tight, confined areas. The coil is too big to fit in the Chilled Water Coils
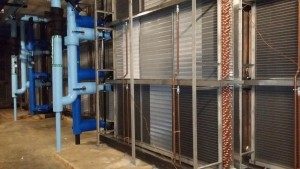
elevator, and/or the HVAC room is so small that you are likely to damage the coil simply by moving it. As a solution to this challenge, chilled water coils are often installed in “banks” of coils. You are most likely to see this configuration in Air Handler Units, as well as “built-up” systems. Due to face velocity limitations across the coil, you will need larger coils in order to meet your required face area. With this in mind, there are a few specific reasons why you want to avoid having a single, large coil in one of your units.  Starting with the obvious: larger coils are much more difficult to transfer and install. This is especially true for older buildings, where the rooms were essentially built around the HVAC system.

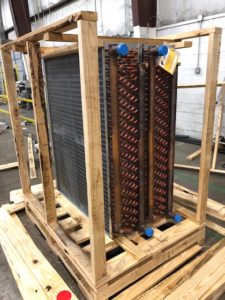
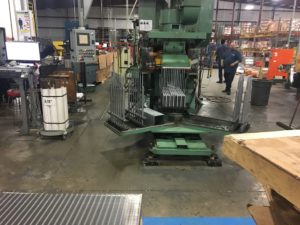
As you’ve probably experienced, some of these areas can barely fit a single person, so installation – if even possible – is a logistical nightmare. Also, the larger the coil, the easier it is to damage during transport to the jobsite. To avoid these issues, simply break down the single, larger coil into smaller coils. When piped together, those smaller coils are stacked into “banks” of coils in the system. If installed correctly, this “bank” should have the same performance as the larger, single coil.
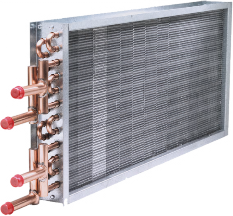
Casing

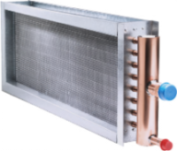
There are many different casing options available, but “stackable” flanges are required for heavy chilled water coils that are “banked”. The flanges are often inverted inward and down to give added strength to the casing, which is needed due to the fact that another coil of equal weight will be stacked on top of it. When ordering coils in a “bank” configuration, be sure to let the manufacturer know that they will be “stacked”.

Many engineers also use stainless steel casings on chilled water coils. While more expensive than traditional galvanized steel, stainless steel protects against excessively wet coils and/or corrosive elements in the airstream. Keep in mind that the majority of coils fail because of old age and its casing, as opposed to failure with the coil’s core. With that in mind, doesn’t it make sense to select heavy-duty stainless steel casings that are more durable and meant for stackable installations?

Drain Pans & Water Carryover

Water Coils

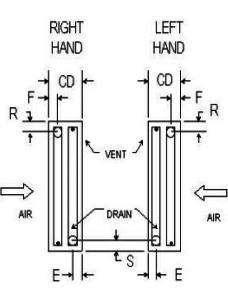
All chilled water coils must be sized so that the face velocity across the coil does not exceed 550 ft/minute. Water on the outside of the coil is carried away from the coil’s leaving air side in an arc, while water in the highest point of the coil is carried further down the unit or ductwork. “Stackable” coils often require intermediate drain pans under each coil to catch the excess water carryover. Each coil in a bank requires its own drain pan, as a single, large pan under the bottom coil is not enough.
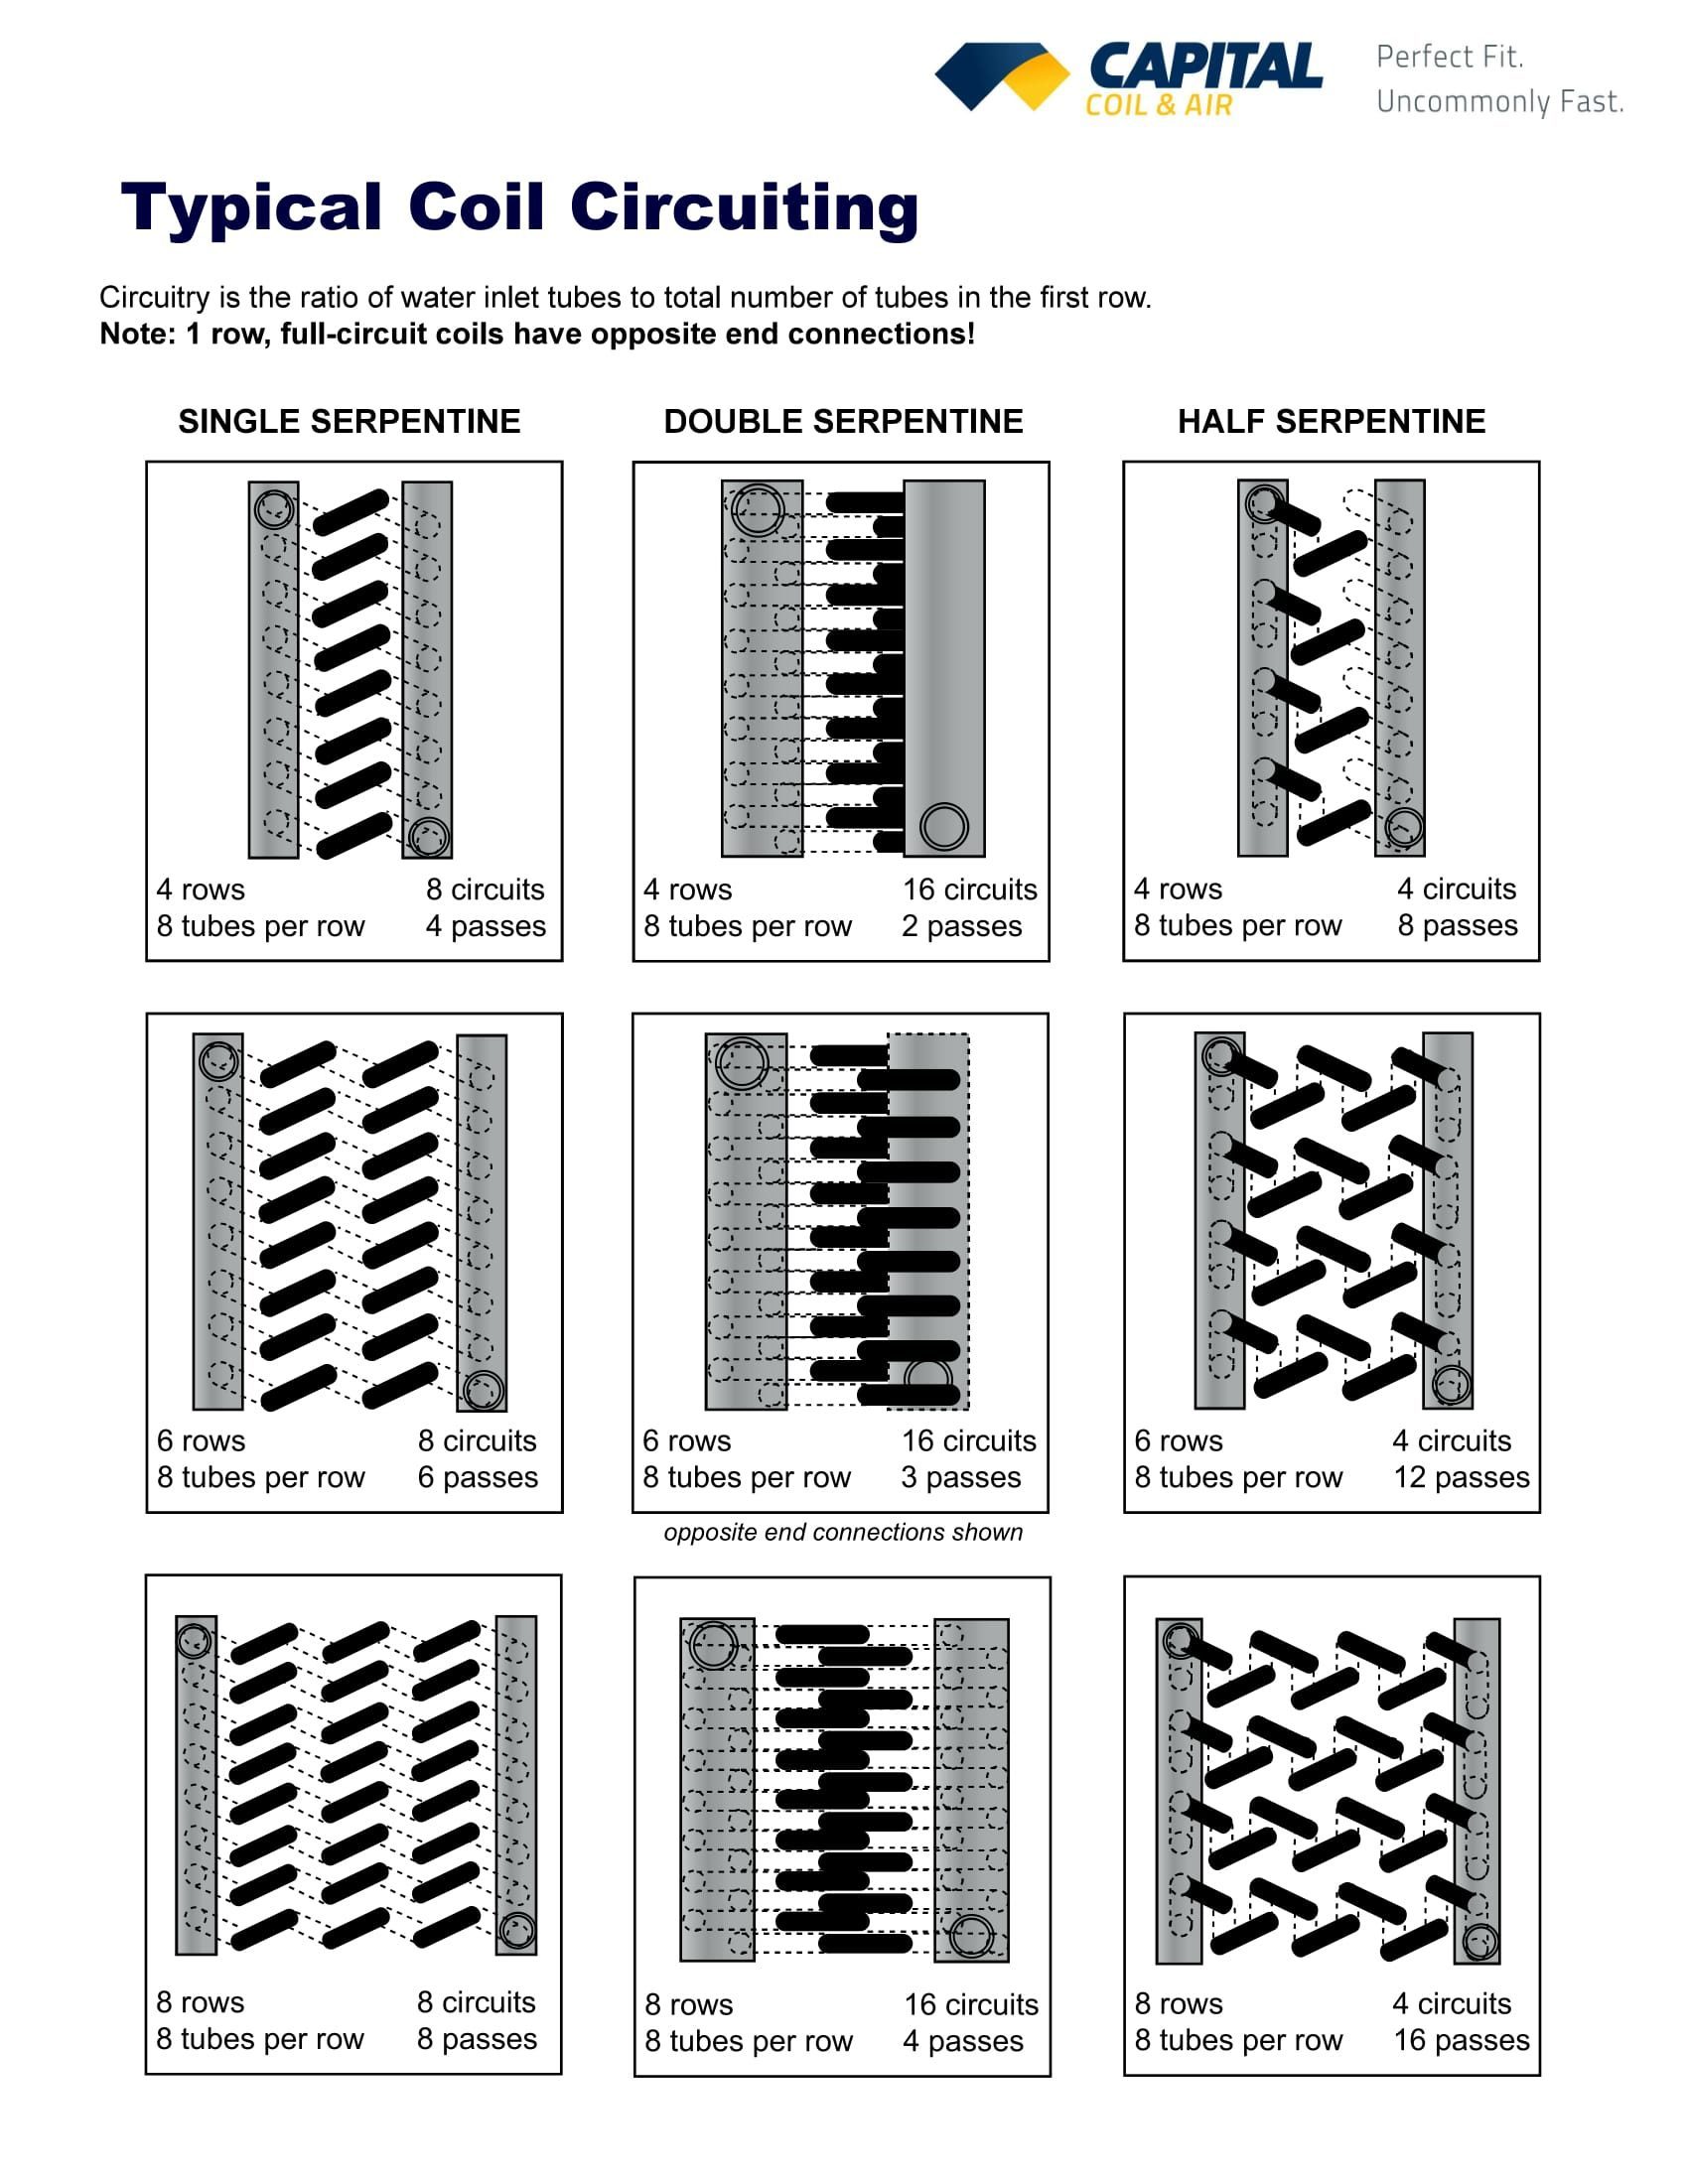
Circuiting/GPM

If all of the coils in a “bank” are of equal size and handling the same CFM, then the GPM of each coil will also be the same.

Always feed the bottom connection on the supply header on the leaving air side of the coil. This ensures counter air and water flow. This also prevents the coil from short circuiting because the header fills first and circuits all of the tubes equally.

Designing Banks Of Coils

Almost all coil “banks” perform more efficiently if you design something more square in shape, as opposed to long and/or high. In a “bank” of coils, you may find that one coil has points of 300 ft/minute, with other points at 800 ft/minute. Scenarios such as this will cause water-carryover! You generally want to be as close to 550 ft/minute as possible in order to allow equal airflow distribution across the face area of the coil.

Anytime you are designing and/or building coils, work closely with the manufacturer as an added resource to ensure that you are getting the ideal solution for your HVAC system. Capital Coil & Air works on similar jobs such as these daily, and we welcome the opportunity to work with you in whatever capacity is needed.

RELATED POSTS

Top 5 Reasons HVAC Coils Prematurely Fail

Coils and Counter-flow: 5 Common Questions

Chilled Water Coil Circuiting Made Easy


Tips on Hand Designation & “Counter-flow”

Are your chilled water coils right hand or left hand?  Are you looking into the face of the coil with the air hitting you in the back of the head?  What exactly is counter-flow and why is it important?  Are you completely confused by why right hand vs. left hand even exists?  Most manufacturers probably do not know or understand the technical reasons themselves.

First, let’s figure out what coils even need a hand determination.  Chilled Water Coils, Direct Expansion (Evaporator) Coils, and Condenser Coils are the only coils that need this figured on almost every job.  Hot Water Coils, Booster Coils, and Steam Coils rarely need this determination!  The reason for this is when the coils are only 1 or 2 rows deep, they can be flipped over.  When a chilled water coil is 3+ rows deep, hand determination is much more important because it needs to be counter-flow.  With most suppliers determining hand designation with the air hitting you in the back of the head….do you want the connections on the right or left?

Chilled Water CoilsYou’ve probably heard the term “counter-flow” countless times, but here’s the simplest explanation.  For peak performance, you want the air and the fluid traveling in opposite directions through the coil.  Is it the end of the world if your coils are not counter-flow?  The short answer is no, but you will lose approximately 5% of the output.  So if your coils are piped incorrectly, don’t expect to get the full performance, but they will still be more effective than whatever you’re replacing.  Steam and hot water coils are 1 or 2 rows deep, so again, counter-flow is pretty much irrelevant.  However, it can make a difference with any chilled water or direct expansion coils (3-12) rows deep.

We also get asked many times “what is the proper way to pipe coils?”  Put simply, steam coils should always be fed on the highest connection and the return on the lowest connection.  Water coils should always be fed on the lowest connection and returned on the top connection to ensure that all of the tubes are are fed the same volume of fluid. 

Hand designation and counter-flow are two pretty simple concepts when they are properly explained.  When dealing with a HVAC coil manufacturer, partner up with one who will walk you through the engineering and explain it along the way.  Capital Coil & Air has well over a decade of experience in handling pretty much any scenario that you may come across, so we want to be your coil resource for any and all projects. Please give us a try on your next job!

RELATED POSTS

Why are HVAC Coils Copper Tube and Aluminum Fin?

Did You Know? Facts about Commercial HVAC Coils

You should never have to worry about performance on replacement coils…Well, almost never!


Condenser Coils Failing? Here’s probably why….

Did you recently turn on your DX systems only to find your Condenser Coils are not working?  Simple fix right?  Unfortunately, no.  If you get lucky, you can send us the model number of the unit, and there’s a great chance we’ve already built it.  In the case that we do not have that model number on file, you have two options.  You can go back to the OEM, wait (5) months for a part and pay through the roof.  Or you call Capital Coil, and we’ll walk you through the engineering it takes to replace a condenser coil.                                                                      Condenser Coils

Very rarely do condenser coils ever freeze so the first thing you’re going to want to know is if your coil died of corrosion, old age, or possibly vibration.  Old age is obviously preferable because with a few easy dimensions, we’ll have enough to price up your duplicate coil.  Condenser coils are usually outside and are easily accessible for measurements and digital pictures.  With just the size, the rows, and fins/inch, you can get a price.  And digital pictures of the headers and return bends will give us a good idea of the circuiting and sub-cooler circuits. 

If the coil has been eaten away by corrosion, it was an improper design to begin with.  Most people don’t know that salt in the air will ruin aluminum fins within a year or two.  There are two ways to combat this.  The first option is to make the switch to copper fins and stainless steel casings.  While this will extend the life of your coil considerably, most people are not too happy about the additional cost over aluminum fins.  The second option is to use a coating.  Coatings are the much more popular choice.  They are a fraction of the cost as copper fins and only add (1 – 2) weeks to your lead time. 

When your HVAC coils are installed near a moving piece of equipment, vibration can occur and cause leaks.  The area where these leaks occur is very important and will clue you in to if the problem is vibration.  If they are near the tube sheet and look like they are slicing through the tube, the coils should be isolated from the rest of the system to prevent vibration from causing damage.  One way to combat this is by oversizing the tubesheet holes, but many manufacturers will not do this.  Condenser coils are usually the most common victims of vibration.

The last concern is with cleaning condenser coils.  Since condenser coils see outside air almost exclusively, they need to be cleaned more than other coils.  The reason for this is most condenser coils have fin spacing of 12-20 fins/inch.  With fins that tight together, the coil can and will act like a filter.  And when the coil is clogged up, the performance suffers greatly.  Recently, we’ve been getting more and more calls about using a heavier fin thickness.  This is to help with high pressure cleaning and corrosive cleaning agents. 

When dealing with an HVAC coil manufacturer, partner up with one who will walk you through the engineering and explain it along the way. Capital Coil & Air has well over a decade of experience and has seen every issue to make sure your everything from the quote to the installation go smoothly! Give us a try on your next project!

RELATED POSTS

Top 5 Reasons HVAC Coils Prematurely Fail

You should never have to worry about performance on replacement coils. Well… almost never!

Repair or Replacement HVAC Coils?


Coils and Counter-flow: 5 Common Questions

1)  Coils and counter-flow?

The first thing to remember about coils and counter-flow is that chilled water coils are always built to be piped in counter-flow. This means that the air flows in the opposite direction as the water. For example, with counter-flow, the air flows through rows 1-8, while the water runs through rows 8-1. Water always travels through the coil in the opposite direction of the air; hence the term “counter-flow.”  Direct Expansion Coils (Evaporator Coils) are also piped in the same manner.

With that said, what happens when you do not pipe cooling coils counter-flow? Almost all coil selection programs you will see or use will be based on counter-flow conditions. If you opt to not counter-flow a chilled water coil, you’ll have to reduce the coil’s overall performance by a certain percentage. That percentage reduction varies based on each coil’s unique dimensions, but a reliable estimate is a loss of 8-12%. Simply piping the coils in the correct manner from the beginning would seem to be the easiest and most cost-effective solution.

2)  Why do you feed from the bottom of the coil?

DX Coils

You always want to feed a water coil from the bottom connection so that the header fills from the bottom on up and feeds every tube connection evenly. All tubes must be fed evenly with the same amount of water. If you try to feed the header from the top, you greatly increase the risk of “short circuiting” the coil and having a higher water flow through the top tubes in the coil.

3)  What is a Water Hammer in a Steam Coil?

On a long Steam Coil, you will be hard pressed to get the steam through the length of the coil. Slowly but surely, that steam converts into condensate, which is pretty much the worst thing that can happen to any system. If not evacuated, the condensate just lays in the coil when the system is shut off. This problem comes into play when the steam is turned back on and meets the condensate laying inside the coil. In addition to the noise, the steam and condensate cause huge amounts of additional stress on the coil’s joints. As a result, over time, your coil will inevitably fail.

4)  What else happens if you do not evacuate condensate?

When you cannot or do not evacuate the condensate on long steam coils, the condensate ends up blocking the steam. A steam coil should never feel cool to the touch, but when condensate blocks steam, one part of the coil will be warm while the other will be cool. Again, that should not happen. Steam coils are interesting in that they are more dependent upon the system and installation than any other type of coil. A steam coil must be pitched to the return end of the coil. Obviously, steam is not water. Traps, vacuum breakers and other steam accessories must be installed and located properly for the system to function.

5)  Is it necessary to pipe steam and/or hot water coils in counter-flow?

Simply put – no! Circuiting a coil is only necessary to ensure the connections are on the side of the coil that you want. The rows and tubes in the coil dictate how and where you feed, but the steam supply always needs to be the high connection. This method ensures that the leaving condensate is on the bottom of the coil and below the lowest tube within the coil. Whatever else you do, know that the condensate must leave the coil!

If you have any questions or need assistance with ordering and/or installation, please contact a sales engineer at Capital Coil & Air. We will walk with you step-by-step through your entire project should you require any assistance. CALL OR E-MAIL US!  We look forward to the opportunity to work with you on your future projects.


RELATED POSTS

Tips on Hand Designation & Counter-flow

Chilled Water Coils & Moisture Carryover

Chilled Water Coil Circuiting Made Easy


Case Study: We Need These Coils on a (5) Day Quick-ship

In late June, Capital Coil received a call from a Trane office in Ohio regarding quick-ship availability. One of Trane’s top customers had an urgent need for (12) large chilled water coils with stainless steel casing. The problem/hurdle that they were encountering was that they needed all (12) coils to be built and ship out of the factory in (5) business days. Completion of the whole project was 100% contingent on them receiving the coils in their specified time-frame. An additional complication was the fact that July 4th was the following week, and they needed to have the coils ship prior to the holiday.

Trane shopped the project around to different manufacturers, but not one could guarantee to ship in (5) days. Some manufacturers waffled and claimed that they could have them built in (6) or (7) days, but not one could guarantee to ship in (5) days. A sales rep in that same Trane office, who had worked with Capital Coil previously, suggested that his co-worker reach out to us to see what we could do. After speaking with Trane’s project manager, we immediately contacted our head of production to make sure that we had the capacity to complete all (12) coils in the required (5) days. She assured us that we had the materials and manpower on-hand to get them all built and ship on time. We agreed to accept the project and began work on the coils immediately.

Due to the size of the project, as well as it’s time-sensitivity, we had multiple calls daily with our factory to ensure that everything was proceeding on schedule. We then gave Trane daily status updates, so they were constantly informed of everything from the brazing of the coils to entering the final testing phase. Chilled Water Coil

As promised, all (12) coils were built correctly and shipped out in the required (5) days. Our logistics team was then in constant communication with the freight company to make sure that the delivery was on schedule. And just like during the production phase, we passed daily tracking updates along to Trane, so they knew where their coils were at all times and when they could expect delivery. All (12) chilled water coils arrived on July 3rd with zero freight damage, and the project was completed on time!

A company as large and influential as Trane can have their coils built by anyone, but Capital Coil was the only manufacturer that could guarantee to have their coils built and shipped by a required date. Additionally, in working so closely with Trane throughout the whole process, they were kept up-to-date in real time from the start of production to final delivery.

Capital Coil offers a level of service that you won’t get with other manufacturers. When we guarantee to ship by a certain date, we stand by that guarantee, or you do not pay!


Trane’s project manager’s comments to Capital Coil upon completion/delivery:

“This will help us get a jump on this project prior to the big event taking place next week! 

I will make sure to share your information with others across our great lakes region about our experience with your company, so that they know we have THIS option to go to for our coil needs. THANK YOU ALL!!”


How to Make Sense of Heating Coils

Various winter storms have already ripped through multiple parts of the country necessitating the obvious need for working heating coils!!  With conditions such as these, emergencies with your HVAC systems are almost inevitable. THIS is precisely when you need your coil supplier to have the speed and flexibility to be able to tackle whatever emergencies arise.Steam Coil

Of all the types of HVAC coils available, heating coils are probably the easiest to select and understand. Capital Coil has listed the three most common types of heating coils that you are likely to come across.

Hot Water Coils

When looking at a water coil, the first thing to remember is that it is in effect “dumb”. In other words, water coils do not know the temperature of the water moving through it. While standard HVAC water coils are mostly constructed in the same design, the number of rows contained within the coil is a key differentiator in determining if the coil is hot water or chilled water. 99% of all hot water coils are (1) or (2) rows based on performance requirements. The “Delta T” between the entering air temperature and the hot water temperature is very large. As a result, you only need a coil with (1) or (2) rows to do the job. Face velocities across the coil can be anywhere from 600 to 1,200 FPM (feet/minute), while water velocities are usually 2-4 FPS (feet/second). As a result, you will always end up with a (1) or (2) row coil with somewhere between 8-14 fins/inch.

Booster Coils

Hot water booster coils are just another variation of the standard HVAC hot water coil.  They are always (1) or (2) rows as well, but the casing is designed for duct work installation. This basically means there is usually a 1” or 1.5” casing on all four sides of the coil. You select the proper size of the coil to make sure the air velocity across the coil is correct and simply transition the duct work to make the casing size around the coil.  Generally speaking, the size of the coil face is larger than the duct size, so you must transition the duct to make it larger. Just remember, a booster coil is nothing more than a standard hot water coil that is used for duct work installation.

There can also be a casing variation called “slip & drive”, where the coil is installed in the duct work. The coil does not have the standard casing on all four sides like a flanged coil. Capital Coil’s selection program allows you to pick either option.

Steam Coils

The real secret to any steam coil installation is to know that steam coils are much more of a product of the entire system than any other coil; meaning that other coil types are much more independent of the system.  Steam coils require numerous considerations, such as traps, pitched casing, piping flexibility, and vacuum breakers.  Steam coils are also built according to steam pressure through the tubes and headers.  2 – 50 psig is considered “low pressure” steam for coils, while 50-100 psig is considered “medium pressure”. Anything over 100 psig is considered “high pressure” steam.  An important fact to remember is that each of these categories requires a separate kind of construction with different brazing and different materials.  Additionally, almost all steam coils are (1) or (2) rows deep. Steam coils are known either as “standard” steam or “steam distributing”, but the differences are very easy to understand.  Outside air temperatures below 40˚F require that you have a “non-freeze” steam distributing coil.

RELATED POSTS 

Stock Hot Water Coils – Quick Buyers Guide

Your Goals as a Buyer of Commercial HVAC Replacement Coils

Coil Costs: What Will Make Your HVAC Coils More Expensive?


5 Work Day Quick-Ships on HVAC Coils – Why Capital Coil does it right

Day 1 – 38% of all orders sent to Capital Coil are on some kind of quick-ship, whether it be on a (5 day, 10 day, or 15 day). We enter the order immediately so that all departments in the plant have the project in their systems and are ready to move on it right away. The coil isQuick-Ships engineered, routing sheets are sent to the shop floor, and everybody now knows what needs to be built. 

Day 2 – Sheet metal casings are cut and sized, headers and connections are fabricated, while tube sheets are fabricated.

Day 3 – All tubing and fins are cut, stamped and assembly begins. You can see what the coil will look like upon final assembly at this point. Coils can be seen sitting on assembly tables.

Day 4 – Tubes are then expanded into the fins, and keep in mind that this is not a short process. Headers are then brazed to the tubes, and if there are return bends, they are connected. The coil is completely assembled and moved to the testing tank. The coil is tested under water for 20 minutes at 550 PSI. About 3% of coils have small leaks someplace in the brazing and are sent back to braze again.

Day 5 – The coil is crated and sent to shipping for routing to the customer. Then most importantly, your coil will be shipping in the guaranteed (5) days.

As you can see by this description, with quick-ships, there is not a lot of room for error in the timing and shipping with OEM HVAC replacement coils. We’ve been doing this for a while now, and we’ve had an approximately (97%) success rate fulfilling all quick-ship requests. We offer quick shipments 365 days per year, with both (10) day shipments & (15) day shipments also available for lower premiums.

diagram 

RELATED POSTS

Are Your Quick-Ships Shut Down When Needed Most???

How to make your HVAC OEM Replacement Coil Buying Process Easier??

OEM Replacement Coils: Repair or Replace???


Why Are Fin Designs On HVAC Replacement Coils Important?

Replacement HVAC Coils

At first glance, fin designs on HVAC replacement coils seem about as exciting as watching grass grow. “Why would I ever care about fin designs on any coil” was probably your initial response to our question. Nevertheless, we would not dedicate a newsletter to this subject if fins were not important.

One of the primary reasons fins are so important is that you want to keep your coil as clean and maintained as possible. In order to properly maintain your coil, you need to have an understanding as to how HVAC replacement coils are constructed. While fins do not look like much, they are MUCH more complicated than what you can observe at the entering or leaving airside of the coil.

To begin, fins are responsible for a surprising 65% – 70% of the heat transfer on any coil, while tubes are responsible for the remaining 30% – 35%. Additionally, in order for your coil to work at optimum performance, you need to have a terrific fin/tube bond, (which we will discuss below).

  1. Fins are known as secondary surface, while tubes are referred to as primary surface. While this may seem counter-intuitive, the secondary surface is responsible for twice the amount of heat transfer as the primary surface.
  2. There are special dies (see picture) that stamp out aluminum or copper fins with the correct thickness, height, and depth to make the coil the correct size. For example, a coil might be 36” (height) x 96” (length) x (8) rows deep x 8 fins/inch.
    1. Fin Height: 36”
    2. Fin Depth: 12”, (8) rows deep
    3. # of fins in the coil: 768 (8 fins x 96”)
  3. Each fin has 192 holes stamped in the fin for 5/8” OD tubes (8 Rows x 24 Tubes), and each fin is identical.
  4. Each hole has extruded metal, which is more commonly referred to as the fin collar. The collars are sized to self-space the fins and allow for later expansion of the tube into the fin collar. This practice is also known as “bonding” and is essential to having your coil run efficiently/correctly.
  5. Each fin is rippled at the entering and leaving edge of the fin to help create air turbulence.
  6. Each fin is corrugated in the direction of airflow to allow for greater air turbulence. This is important to remember because turbulence creates heat transfer.

So again, what is the point of understanding the importance of fins in HVAC coils? While coils can be built with flat fins for various reasons, the vast majority of coils are built with enhanced fins. Enhanced fins help to ensure that the airflow is not running straight through the coil.

Regardless of fin type, keep in mind that HVAC coils can and will act as great “filters”. The tubes are staggered and not in-line; while the fins are designed to help break up the airflow and not facilitate an easy, straight-through air path. Dirt and/or other particles in the air get caught easily, which again, is why coils can act as great filters. Additionally, coils with more rows will usually get dirtier than coils with less rows. Lastly, chilled water or DX coils are typically wet coils, which results in them catching virtually everything in the air.

The amount of BTU’s through any coil is in direct proportion to the amount of air through the coil. For example, if you are only getting 90% of the design air through the coil, then you are only getting 90% of the BTU’s.

Coils require good filtration and periodic maintenance. If not done correctly, you’ll pay the price of higher energy costs on an inefficient coil.

By now, you have hopefully come to the realization that HVAC coils are much more complicated than they appear, and that fins are an integral part of the coil as a whole. Again, while admittedly not the most exciting topic, understanding the role and importance of fins in HVAC coils cannot be overstated. Capital Coil & Air is here to help you with any and all coil selections, and we look forward to working with you on your next project.

RELATED POSTS

Repair or Replacement Coils?

Top 5 Reasons HVAC Coils Prematurely Fail

Are You Asking Your Coil Supplier These Questions?


Different Types of Steam Coils

There are two types of steam coils:  standard steam coils, which are used in most reheat applications, and steam distributing coils, which are used in applications where the entering air temperature is below 40 F degrees.  Many times, this type of coil is also known as a “non-freeze” coil, but that name is misleading because in reality, there is no such thing as “non-freeze”. 

Standard Steam

Standard steam coils operate a lot like hot water coils, but the construction is very different even if the coils appear to be constructed the same.  The supply and return connections are often on the same end like a hot water coil.  But, steam is very different than hot water, and the coil must be built for and circuited for steam.  Keep in mind that steam is always more erosive than hot water.  The brazing and tube wall thickness must account for steam. ALWAYS remember that even low pressure steam is more erosive than hot water, and a steam coil needs to be built accordingly.

Steam Distributing (Non-Freeze)

Steam distributing coils are a completely different type of coil because they are constructed as a tube within a tube. Every place that you see an outside tube or header, there is an inside tube and header that you can’t see. The steam on the inner tube keeps the condensate in the outer tube from freezing.  The purpose of the Steam Coiloriginal coil design was to distribute the steam evenly along the length of the coil and to eliminate any dead spots on the coil.  A byproduct of this coil was also found.  The coils didn’t freeze nearly as easily as the standard steam coil, so the coils became known as “non-freeze”, which as mentioned, is not completely accurate.  Any coil can freeze under the right conditions, but, this design is what needs to be used when the entering air is under 40F degrees!!! 

Steam Coil Design

Steam coil designs can be very tricky.  Steam coils are totally a function of the system and installation, while other coils operate more independently of the system.  There needs to be correctly designed traps, and they need to be installed in the correct place and depth in the system.  Often, vacuum breakers are also needed in the system.  The piping must also be installed correctly to make sure the steam is entering the coil and not the condensate.  Even with all of those factors, you’ll need a correctly designed steam coil that matches the steam pressure, length of the coil, and the entering air temperature.  Coils can freeze easily.  Coils can be too long in length and the steam cannot travel the length of the coil and distribute evenly.  Condensate can easily be trapped somewhere in the coil, and the result is water hammer. 

Capital Coil & Air has years of experience designing steam coils, and is here to answer any questions and help to design the right coil for your project! 

Related Topics

Frozen Steam Coils: How to Prevent it!

Commercial Steam Coils; Lengths & Controls

HEATING SEASON WILL SOON BE UPON US


Top 5 Reasons Commercial HVAC Coils Prematurely Fail

Capital Coil & Air has come across virtually every scenario over the years in which a commercial HVAC coil had to be prematurely replaced, and we have since created an easy guide targeting the main reasons HVAC Coils prematurely fail.

  • Coil Plugging: If you are not changing filters and/or your commercial HVAC coils are not properly cleaned in a timely manner, your coil will actually begin to act as a filter. When dirt builds up on the coil, that blockage prevents heat transfer and can cause an approximate 20% to 40% drop in performance. Dirt adds to the coil resistance and can be a primary cause for your coil to fail prematurely.
  • Vibration: When your HVAC coils are installed near a moving piece of equipment, vibration can occur and cause leaks. You can tell if vibration is the main cause if leaks are near the tube sheet and look like they are slicing through the tube. If/when that happens, the coils should be isolated from the rest of the system to prevent vibration from causing damage. One way to combat this is by oversizing the tubesheet holes, but many manufacturers will not do this. Condenser Coils are usually the most common victims of vibration.
  • Corrosive Environment: This applies to both the air in the environment and inside the tubes. For instance, if there is a corrosive element in the air, it will eat away at the copper tubes; whether you have 0.020” wall or 0.049” wall. This is very common in coastal areas where there may be salt in the air. To keep the costs down from going to a stainless steel or cupro-nickel coil, we usually suggest coating the HVAC coils. Coatings are almost always within your budget, and its application will only add about a week to the overall lead time. Steam condensate and untreated water can cause corrosion within the tubes of HVAC coils as well. If you have a steam coil that has failed before the one year warranty, there’s a great chance that corrosive agents are in the steam, and it’s eating away at the copper tubes.
  • Freeze-Ups: Most people think that when HVAC coils freeze, the water or condensate laying in the coil freezes into ice and it expands causing the tubes to bulge and eventually spring leaks. What really happens is that the coil will freeze in multiple areas simultaneously, and it’s the pressure between these areas that cause the tubes to swell and eventually burst. These are very easy to spot as the leaks will run the length of the tube rather than around the tube.  ALSO be very careful when considering “freeze-proof” coils!  If you remove 5-6 inches from the fin length to make the “freeze-proof” application fit, your coil’s performance will suffer considerably. 
  • System Design: You would be amazed to learn how many HVAC coils were never designed properly for their systems. If there is a design problem, replacing the coil will only waste time and money; while you have done nothing other than duplicate the previous problem. A little known fact in the replacement market is that a high percentage of all our projects are because the coils were built incorrectly or were never designed correctly in the first place. In some cases, owners attempt to improve the coil’s performance by adding additional rows. Most however do this without taking into account the air pressure drop or fluid pressure drop that comes with it.

When dealing with an HVAC coil manufacturer, try to partner up with one who will walk you through the engineering and explain it along the way. Capital Coil & Air has well over a decade of experience and can help you diagnose whatever problem that you are experiencing correctly the first time. We look forward to working with you on your next project!

RELATED POSTS

Four Things That You Need When Buying Replacement Coils

Replacement HVAC Coils: 10 Common Ordering Mistakes

Coil Costs: What Will Make Your HVAC Coils More Expensive?