Top 10 Tips For Measuring HVAC Coils

1. When measuring HVAC coils, performance has very little to do with accurately measuring for replacement coils. Fitting the coil in the existing space with the least amount of labor has everything to do with measuring a coil.  If you duplicate the coil in almost every respect, the performance will match and take care of itself.  New is always more efficient than old.

2.  If you’re ever in doubt about a dimension, smaller is always better than bigger. You can always “safe off” around any coil as long as you can fit it in the space.  If a coil is too big, it makes a really ugly coffee table in your shop.  Too big is the enemy of measuring coils.

Chilled Water Coil

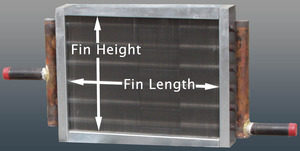
3.  The fin height and fin length are not the determining factors in measuring a coil. The overall casing dimensions are the most important, and you work backwards to determine fin dimensions.

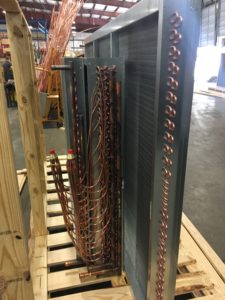
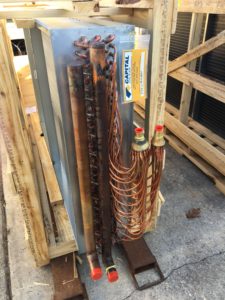
4.  The depth of any coil is the total casing depth in the direction of airflow. The height is the number of tubes high in any row.  Depth is a function of rows deep and height is a function of tubes in a row.

5.  Overall length (OAL) is not the fin length and it’s not the casing length. It is the length from the return bends to include the headers that are inside the unit.  Again, it is necessary to work backwards to get the other dimensions once you know this critical dimension.

6.  Circuiting is the number of tubes connected to the supply header. Generally, you just want to count the number of tubes connected to the header and that will tell you whether it’s full, half, or even a double circuit.  It does not matter how the return bends are configured.  Your goal is to count the number of supply tubes and all performance is based on that.

7.  Fins are measured in fins per inch. Hold a tape measure up to the coils and count the number of fins in one inch.  If you can’t get in to take the measurement, a safe rule of thumb is 10-12 fins/inch.  That will work on almost every coil.  The exception to that rule is a condenser coil.  14-16 fins/inch on a condenser coil is usually pretty safe.

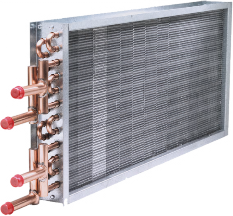
8.  Connection locations are difficult only if you are using the existing piping in the system (which are welded). Copper piping is brazed and can be changed easily.  If a system is old and the piping is being replaced as well as the coil, the connection location is not a major deal.  It’s very easy to match up!

9.  With replacement coils, the concept of “left hand vs. right hand” doesn’t actually exist. Connections are “top left-bottom right” or vice versa.  Ideally, all coils should be counter-flow which means that the water and air flow in opposite directions.  The air hits row one first and the water is piped into row eight first.  However, there are lots of installations that are piped backwards, and they work just fine.  Just match them up, and the coil’s performance will be equal to the old coil.

10.  Connections are not measured from the top of the header! They are measured from the top of the casing to the centerline of the connection.  Or the bottom of the casing to the centerline.  You need a point of reference, and the header height can be anything just as long as it doesn’t stick above or below the casing height.


All of the above “suggestions” or “secrets” are in no particular order.  They are just things that you should know to ensure that you are selecting the correct replacement coil. While most seem like common sense, your best bet is to talk with the sales team at Capital Coil & Air, who can walk your through the entire process and help you to fill out coil drawings when trying to measure the dimensions.

RELATED POSTS

Replacement HVAC Coils: 10 Common Ordering Mistakes

The Smart Approach to Buying HVAC Coils (and Saving Money)

Top 10 Chilled Water Coil Facts


Looking For A Trane Replacement Coil

If you need Trane replacement coil within a Trane system, but aren’t sure about the dimensions or decoding the model #, send this to Capital Coil & Air for pricing. On most Trane AHU’s, the AHU model #, as well as the coil or “part #”, is listed as “Service Model No Coil”. If you see this, send it over, and the sales team at Capital Coil will handle the rest. Great pricing with the ability to be built as fast as is needed!Trane replacement coil


Case Study – Replacement DX Coils at local Mushroom Farms

Replacement DX Coils: To those not aware, Kennett Square, PA is the mushroom growing capital OF THE WORLD! Kennett Square is also located quite close to Capital Coil’s sales office in West Chester, PA, and we get multiple requests per month to personally come out and measure DX coils that need to be replaced at these farms.

Mushrooms need a well-ventilated growing environment, and poor ventilation can lead to higher levels of CO2. Higher CO2 levels negatively affect mushroom quality and growth. Ensuring proper air circulation is essential for maintaining healthy crops. Mushrooms also thrive in high-humidity environments, but excessive moisture can also lead to mold or bacterial growth, which can damage the entire crop. Proper humidity control is crucial to maintaining the right balance and preventing costly losses. To tackle these problems, growers need reliable climate control systems, and that’s where Capital Coil steps in.

Mushroom cultivation, while lucrative, is not without its challenges. Running climate control systems for mushroom farming can be expensive, especially when using inefficient equipment. High energy costs can eat into profits, particularly for smaller, family-owned operations. One of the biggest challenges for mushroom farmers is making sure that the coils are working at peak efficiency because the conditions in and around those farms will corrode the aluminum fins at a faster pace than most other environments. As mentioned above, there are very specific conditions that need to be maintained for a successful crop, so the coils in the condensing systems that are needed to sustain those conditions have to be working at all times. 

One farm had been trying to repair numerous coils through different “band-aid” methods. None of these attempts worked, and the farm’s energy costs had skyrocketed when trying to get the same capacity from a failing coil.  One of the neighboring farms that had used us for numerous DX coil replacements recommended that they call Capital Coil to come out and assess the failing coils.DX Coils

After looking at a few of the units, most of the coils’ finned area had been eaten away by corrosive elements in the air. The OEM had not recommended any protection for the coils, which was why they failed far sooner than they should have. The new coils were to be installed in the original units, so the measurements needed to be exact. I also explained to them that any new coil(s) needed to either have more durable materials, such as stainless-steel casing and/or copper fins, or a protective coating for the whole coil. If not, these same issues would continue to occur.

The farm decided to order (1) DX coil with an epoxy coating as a “test” before ordering the rest. The new DX coil arrived a few weeks later and was a perfect match for the original unit. A year later it was still running at max capacity with zero damage to the finned area because of the coating.

Due to the speed that we were able to come out to the site, correctly assess the reasons for the coil failures, and make recommendations on increasing the coil’s longevity, they decided to order the remaining batch of DX coils from Capital Coil & Air. They also recommended us to many of the other farms in the area, so Capital Coil is now the main HVAC coil replacement company for many of the largest mushroom farms in the United States.

RELATED POSTS

OEM Replacement Coils: Repair or Replace

Why are HVAC Coils Copper Tube and Aluminum Fin

Top 10 Tips For Measuring HVAC Coils


Why are HVAC Coils Copper Tube and Aluminum Fin

HVAC CoilsIt’s really not a coincidence why HVAC coils use copper tubes and aluminum fins. Copper is great for heat transfer, and aluminum – while still very effective -is simply not as good. The first goal of any HVAC coil is to cool or heat. Heat transfer is always the first consideration. Cost is the second. Copper works well for the tubes, but would be prohibitive for the fins. You would need a compelling reason for the fins to be copper, and sometimes there are reasons to do just that. However, the vast majority of HVAC coils that you see are built with copper tubes and aluminum fins. That combination offers the most effective heat transfer at the most efficient cost. 

To begin, fins are responsible for a surprising 65% – 70% of the heat transfer on any coil, while tubes are responsible for the remaining 30% – 35%. Additionally, in order for your coil to work at optimum performance, you need to have a terrific fin/tube bond. Fins are known as secondary surface, while tubes are referred to as primary surface. While this may seem counterintuitive, the secondary surface is responsible for twice the amount of heat transfer as the primary surface.

The tubes are expanded into the fins, and for that reason, the fins become secondary. As mentioned above, the fins are responsible for 65% – 70% of all heat transfer that takes place in the HVAC coil.  When you think about it logically, it really makes sense. At 8 fins/inch or 10 fins/inch, and with fins that run the height and depth of the coil, there is much more fin surface than tube surface. However, it also points out how good the fin/tube bond must be in the expansion process. Without that bond, the fins cannot perform their job.

Understanding the role and importance of the materials used in HVAC coils cannot be overstated. There is a distinct reason why the vast majority of coils are constructed using these materials. While coils can be built with other tube materials, such as steel, 304/316 stainless steel, 90/10 cupro-nickel, as well as various different fin materials, none of these are as efficient or economical as copper/aluminum.

Capital Coil & Air is here to help you with any and all coil selections, and we look forward to working with you on your next project.

RELATED POSTS

Why Is Fin Design On HVAC Coils Important?

Top 10 Tips to Measuring Coils

Did You Know? Facts about Commercial HVAC Coils


OEM Replacement Coils: Repair or Replace

When considering OEM replacement coils, there are multiple reasons why coils can fail prematurely. Sometimes, OEM Coils simply freeze and can never be repaired. Other times, the coil was selected incorrectly, which in turn, made the coil significantly underperform. Many times, there is substantial corrosion or something else in the system that causes the coil to fail. However, most coils, when selected correctly, and in systems that are properly maintained, can last anywhere from 10-30 years!  10-30 years is also a pretty wide range, and there are many variables in how long you can expect a coil to perform. Factors, such as ongoing maintenance, air quality, and water/steam quality all have an effect on a coil’s lifespan.

OEM Replacement Coils

Reasons Why Coils Fail Of Old Age

  • While the coil’s tubes are considered the primary surface, 70% of all coil performance is performed by the finned area on a coil, which is known as the secondary surface. The fin/tube bond is easily the most important manufacturing feature in any coil. Without the bond between the tubes and fins, the coil could never properly function. Like all things however, over time the fin/tube bond becomes less efficient with constant expansion and contraction. While the construction of the coil, as well as the fin collars, does not allow the fins on the coil to move, that fin/tube bond naturally weakens a coil’s life over time after installation. Because of this, it is not a stretch to say that a coil is easily 30% less efficient after (20) years.
  • Cleaning coils often pushes dirt to the center of the coil, and this occurs even more so on wet cooling coils. Just remember that coils can become great air filters if not properly maintained. The BTU output of any coil is in direct proportion to the amount of air going through the coil. If you decrease the CFM by 20%, you are also decrease the BTU’s by 20%!
  • Cleaning agents often corrode aluminum fins. Since every square inch of fin surface matters in performance, corrosion of the fin surface is always detrimental to the coil’s performance.
  • Many times, there are coil leaks simply because of old age. No coils are immune to erosion. You might find the brazing in the tubes, as well as the brazing in the header/tube connections failing over time. Steam can be both erosive and corrosive under higher pressures. Water travels through the coil at 2 – 5 ft/second, so erosion is an enormous part of coil failure, regardless of how well-maintained. Erosion is always there, whether you realize it or not.
  • Water/steam treatment and the corrosive effects of bad steam/water can all be causes of coil failure…which then necessitates the need for a reliable manufacturer for OEM replacement coils.

So What Is The Solution?

Some coils can last 5 years, and some coils can last 30 years. As you have read, there are numerous factors that contribute to a coil’s life. In the end, there will most likely have been multiple attempts to repair that coil to make it last as long as possible. The depressing news is that most of these “Band-Aid” attempts do not work well. The most likely outcome is that you are buying a new coil anyway, so why waste the time and money on a temporary solution?

Coil failure is a “pressure event”, which is a fancy way of saying that a coil is leaking. We’ve listed some of the most common repair methods that you are likely to come across:

  • Drop leaking tubes from the circuit: Keep in mind however that every dropped tube reduces the coil’s performance by triple the surface area of the tube that is dropped. Again, while ok in the short-term, this is simply another “Band-Aid” fix. Over time, your energy costs will rise exponentially, and you will probably end up buying a new coil anyway.
  • Braze over the existing braze: As mentioned above, erosion has caused the original braze to fail, so all that you are really doing is pushing the pressure to another braze, which will then begin to fail as well.
  • High Pressure Cleaning: This method bends the fins, further restricts the airflow, and pushes dirt more to the center of the coil, which can never be adequately cleaned.

The real reason why coils need to be replaced rather than repaired is due to energy costs. If your coil is not operating near desired levels, you’ll need to increase the energy to make it work at its peak performance. Energy increases might be slight at first, but they are guaranteed to continue to rise over time. For example:

  • Somebody adjusts the fan drive for higher speeds, higher CFM’s and higher BTU’s.
  • Someone adjusts the boiler; the water and steam temperatures are higher.
  • Someone adjusts the chiller (1) degree higher for colder water to the chilled water coil.

Whichever method is used, performance begins to suffer and adjustments to the system occur. These adjustments cost energy efficiency and ultimately, money!

If you have ever experienced repairing a coil, then you know it is labor intensive and typically will not work as a permanent solution. With very few exceptions, repairs should be seen as nothing more than temporary until you’re able to replace that coil!

Capital Coil & Air has seen every “repair” method used, as well its inevitable outcome, so instead of putting yourself through that, call Capital Coil and allow us to be your coil replacement experts.

RELATED POSTS

Is Your Quick-ship Shut Down When Needed Most??

Four Things That You Need When Buying Replacement Coils

Replacement HVAC Coils: 10 Common Ordering Mistakes

Top 5 Reasons HVAC Coils Prematurely Fail


Now Offering R-454B Refrigerant for All DX Coils

In keeping with most of the OEM’s in 2025, Capital Coil is helping everyone transition from R-410A over to R-454B refrigerant in their DX Coils. Whether you are designing a new system, or retrofitting an existing one with a condensing system, Capital Coil can help in making the switch in refrigerants.DX Coils

If you are not yet aware, the EPA is working hand in hand with many of the major OEM’s to help reduce commercial HVAC’s carbon footprint. One of the major ways in which HVAC manufacturers are helping and complying with the new industry standards is the gradual change in refrigerants from R-410A to R-454B. Beginning in January, 2025, no new system is allowed to be built or imported using the older refrigerants. Without going into a deep dive on the differences, R-454B offers a lower GWP (global warming potential) alternative to R-410A. Hence the mandate to change to that refrigerant type. 

However, Capital Coil will still offer R-22 and R-410A for DX Coils in older systems that might not be compatible with R-454B. In other words, Capital Coil has been, and will remain, the most reliable source for all commercial and OEM replacement coils. Our #1 job is to make to your job easier, so please reach out. You will be glad you did.

RELATED POSTS

What Does “Splitting” A DX (Evaporator) Coil Mean?

Condenser Coils Failing? Here’s probably why….

OEM Replacement Coils: Repair or Replace


How to make your HVAC OEM Replacement Coil Buying Process Easier??

Roughly 100% of HVAC OEM replacement coil shipments use some kind of trucking company or common carrier. There are occasions when the shipment is small enough to use UPS or FedEx, but the vast majority of HVAC shipments are sent by way of truck. Anyone who has frequently used freight companies has experienced damaged shipments and/or late arrivals. In our industry, these annoyances and inconveniences are typically written off as “the cost of doing business”. Think of the airline industry as an example. Our expectations have been reduced to point where we expect something to go wrong and are pleasantly surprised when the trip is smooth from start to finish.

Many folks might not know this, but even before the pandemic struck, the trucking industry in general had been experiencing a gross shortage of drivers throughout the country. Some estimates have put this shortage of drivers as high as 50,000 throughout the country.

So what does this shortage mean for the HVAC industry? Put simply, it translates into complications and confusion for all involved.

  • Longer delivery times. For example, a delivery that used to take (3) days is now (5-7).
  • One major reason for the longer delivery times is that trucks now have many more stops than in years past. There are also many instances of more trips through connecting terminals as well.
  • More time on the truck usually equates to both “visible” and “hidden” freight damage.
  • The shipments become harder to track, and with fewer people at the trucking companies doing more work, shipments can and will get lost entirely.

Because the freight process is at the very end of the OEM replacement coil buying cycle, Capital Coil & Air has developed some simple strategies for the entire buying process that should help in avoiding many of the annoyances listed above. We’ve also added a very useful “hint” to counter longer freight delivery times.

  • Getting a price, delivery & accurate proposal from your vendor: Capital Coil responds to every quote request quicker than any of our competitors, and we are always willing to put that claim to the test. A (2) day delay in receiving your quote is the same as a (2) day freight delay on the back end.
  • Receiving your submittal drawings in a timely fashion: You need to approve these drawings, so once again, how is a (2) day delay in receiving approval drawings any different than receiving your order (2) days late?
  • Quick-Ships: As you’ve probably experienced numerous times in the past and/or present, other coil manufacturers seem to be consistently shutting down their quick-ship programs with little to zero notice for the customer. Why is this? Many manufacturers take on a glut of OEM replacement coil business, or other large projects with small profit margins. In many cases they do this simply to keep the factory running during the slower periods of the year. This has the effect of delaying standard lead times, and in many cases, cancelling quick-ships altogether. It is very hard to do business with companies that make themselves unavailable when you need them the most.

Capital Coil NEVER shuts down our quick-ship programs, and we emphasize NEVER! Over the last (2) years, CCA has hit approximately 99% of all quick-ship orders.

  • Crating equipment to minimize freight damage.OEM Replacement Coil
  • Shipping on time: Simply put, we consistently ship when we say we’re going to ship.
  • Select a freight carrier that delivers to your area without interlining or stopping at several terminals: This is when freight damage is most likely to occur!
  • Pay the carrier fee for a guaranteed delivery date: Although seemingly not well-known, most carriers offer a guaranteed delivery date for a fee of $50-$100. Paying the fee will ensure that your order is now a “priority”, and most freight companies schedule deliveries based on these “priorities” first. If both your order and delivery are critical and time-sensitive, Capital Coil can help you with exploring these delivery options.

Capital Coil & Air will work with you throughout the entire buying and shipping process because you as the customer, deserve to work with a hands on manufacturer that will not turn its back on you once the order has been placed. Please give Capital Coil a try on your next project!

RELATED POSTS

Quick-Ship Fan/Coils & Light Duty Air Handlers

Quick, Reliable & Uncommonly Fast

Top 10 Tips to Measuring Coils


What Does “Splitting” DX (Evaporator) Coils Mean

***Now Offering R-454B Refrigerant for All DX Coils

“Splitting” DX (Evaporator) coils is one of the toughest concepts to understand in the coil business. “Splitting” the coil simply means that (2) or more compressors can operate off of the same coil. One obvious advantage, or reason that you might “split” DX (Evaporator) coils is that you can shut down (1) of the compressors when the cooling load does not require it. This in turn saves energy, which saves $ when the cooling load is not operating at maximum design conditions. For example, let’s use a coil that is designed to give you (40) tons, but the coil is split so that (2) 20-ton compressors are feeding the same coil. If you only require ½ of the maximum load on any given day, you can shut down (1) compressor completely and operate the other one at 100%. This is a money-saving feature that you need to be aware of if you deal with DX coils on a regular basis. This requires special circuiting arrangements, and this is where the confusion starts with most folks. There are three primary ways to deal with this:DX (Evaporator) Coils

FACE SPLIT

Splitting the coil is nothing more than putting (2) completely separate fin/tube packs (coils) into one common casing. When you hear the term “face-splitting” a coil, you are drawing a horizontal line from left to right across the face of the coil and dividing the coil into a top and bottom half. It is like having two separate coils in one casing in that each half is circuited by itself. You hook up (1) compressor for the top half, and (1) compressor for the bottom.

In practice, this configuration is no longer used with much frequency because this arrangement leads to air being directed across the entire face of the coil. This disadvantage is especially apparent when only one half of the coil is in use because you’ll need a complicated damper/duct system to ensure that air is only directed to that portion of the coil in operation.

Row Split

“Row splitting” a coil is dividing the coil by drawing a line vertically and putting some portion of the total rows in (1) circuit, while putting the remaining rows in the other circuit. With this configuration, the air passes across the entire face of the coil, and will always pass across the rows that are in operation.

Please be aware that this configuration also comes with certain issues in that this kind of split makes it very hard to achieve a true 50/50 split. Let’s use an (8) row coil as an example. You would like to “row split” this coil with (4) rows/circuit, which would appear to be a perfect 50/50 split. The problem here is that the first (4) rows, located closest to the entering air, pick up a much higher portion of the load than the last (4) rows. In actuality, this coil’s split is closer to 66% / 34%, which will not match the 50/50 compressors. Another option is try to split the coil between (3) & (5) rows. While not 50/50 either, this configuration is closer. However, a new challenge arises because you have now created a coil that is very difficult to build and correctly circuit. In short, you need almost perfect conditions along with a degree of luck to achieve a true 50/50 split using this method.

Intertwined Circuiting

The most common to split coils today is to “intertwine” the circuiting. This means that every alternate tube in the coil is included in (1) circuit, while the other tubes are included in the (2nd) circuit. For example, tubes 1, 3,5,7,9, etc. in the first row are combined with tubes 2, 4, 6,8,10, etc. in the second row. The same tubes in succeeding rows form (1) circuit. You are essentially including every alternate tube in the entire coil into (1) circuit, which (1) compressor will operate. All of the remaining tubes not included in the first circuit will now encompass the second circuit.

The advantage of this configuration is that the air passes across the entire face of the coil, and, if one of the compressors is on, there are always tubes in operation. Every split is now exactly 50/50 because it cannot be any other way. Most DX coils are now configured in this manner due to these advantages.

Capital Coil has been, and will remain, the most reliable source for all commercial and OEM replacement coils. Our #1 job is to make to your job easier, so please reach out. You will be glad you did.


RELATED POSTS

CHILLED WATER, DX (EXPANSION) COILS & MOISTURE CARRYOVER

Now Offering R-454B Refrigerant for All DX Coils

DX & Chilled Water Cabinet Coils


Condenser Coils Failing? Here’s probably why….

Did you recently turn on your DX systems only to find your Condenser Coils are not working?  Simple fix right?  Unfortunately, no.  If you get lucky, you can send us the model number of the unit, and there’s a great chance we’ve already built it.  In the case that we do not have that model number on file, you have two options.  You can go back to the OEM, wait (5) months for a part and pay through the roof.  Or you call Capital Coil, and we’ll walk you through the engineering it takes to replace a condenser coil.                                                                      Condenser Coils

Very rarely do condenser coils ever freeze so the first thing you’re going to want to know is if your coil died of corrosion, old age, or possibly vibration.  Old age is obviously preferable because with a few easy dimensions, we’ll have enough to price up your duplicate coil.  Condenser coils are usually outside and are easily accessible for measurements and digital pictures.  With just the size, the rows, and fins/inch, you can get a price.  And digital pictures of the headers and return bends will give us a good idea of the circuiting and sub-cooler circuits. 

If the coil has been eaten away by corrosion, it was an improper design to begin with.  Most people don’t know that salt in the air will ruin aluminum fins within a year or two.  There are two ways to combat this.  The first option is to make the switch to copper fins and stainless steel casings.  While this will extend the life of your coil considerably, most people are not too happy about the additional cost over aluminum fins.  The second option is to use a coating.  Coatings are the much more popular choice.  They are a fraction of the cost as copper fins and only add (1 – 2) weeks to your lead time. 

When your HVAC coils are installed near a moving piece of equipment, vibration can occur and cause leaks.  The area where these leaks occur is very important and will clue you in to if the problem is vibration.  If they are near the tube sheet and look like they are slicing through the tube, the coils should be isolated from the rest of the system to prevent vibration from causing damage.  One way to combat this is by oversizing the tubesheet holes, but many manufacturers will not do this.  Condenser coils are usually the most common victims of vibration.

The last concern is with cleaning condenser coils.  Since condenser coils see outside air almost exclusively, they need to be cleaned more than other coils.  The reason for this is most condenser coils have fin spacing of 12-20 fins/inch.  With fins that tight together, the coil can and will act like a filter.  And when the coil is clogged up, the performance suffers greatly.  Recently, we’ve been getting more and more calls about using a heavier fin thickness.  This is to help with high pressure cleaning and corrosive cleaning agents. 

When dealing with an HVAC coil manufacturer, partner up with one who will walk you through the engineering and explain it along the way. Capital Coil & Air has well over a decade of experience and has seen every issue to make sure your everything from the quote to the installation go smoothly! Give us a try on your next project!

RELATED POSTS

Top 5 Reasons HVAC Coils Prematurely Fail

You should never have to worry about performance on replacement coils. Well… almost never!

Repair or Replacement HVAC Coils?


Coils and Counter-flow: 5 Common Questions

1)  Coils and counter-flow?

The first thing to remember about coils and counter-flow is that chilled water coils are always built to be piped in counter-flow. This means that the air flows in the opposite direction as the water. For example, with counter-flow, the air flows through rows 1-8, while the water runs through rows 8-1. Water always travels through the coil in the opposite direction of the air; hence the term “counter-flow.”  Direct Expansion Coils (Evaporator Coils) are also piped in the same manner.

With that said, what happens when you do not pipe cooling coils counter-flow? Almost all coil selection programs you will see or use will be based on counter-flow conditions. If you opt to not counter-flow a chilled water coil, you’ll have to reduce the coil’s overall performance by a certain percentage. That percentage reduction varies based on each coil’s unique dimensions, but a reliable estimate is a loss of 8-12%. Simply piping the coils in the correct manner from the beginning would seem to be the easiest and most cost-effective solution.

2)  Why do you feed from the bottom of the coil?

DX Coils

You always want to feed a water coil from the bottom connection so that the header fills from the bottom on up and feeds every tube connection evenly. All tubes must be fed evenly with the same amount of water. If you try to feed the header from the top, you greatly increase the risk of “short circuiting” the coil and having a higher water flow through the top tubes in the coil.

3)  What is a Water Hammer in a Steam Coil?

On a long Steam Coil, you will be hard pressed to get the steam through the length of the coil. Slowly but surely, that steam converts into condensate, which is pretty much the worst thing that can happen to any system. If not evacuated, the condensate just lays in the coil when the system is shut off. This problem comes into play when the steam is turned back on and meets the condensate laying inside the coil. In addition to the noise, the steam and condensate cause huge amounts of additional stress on the coil’s joints. As a result, over time, your coil will inevitably fail.

4)  What else happens if you do not evacuate condensate?

When you cannot or do not evacuate the condensate on long steam coils, the condensate ends up blocking the steam. A steam coil should never feel cool to the touch, but when condensate blocks steam, one part of the coil will be warm while the other will be cool. Again, that should not happen. Steam coils are interesting in that they are more dependent upon the system and installation than any other type of coil. A steam coil must be pitched to the return end of the coil. Obviously, steam is not water. Traps, vacuum breakers and other steam accessories must be installed and located properly for the system to function.

5)  Is it necessary to pipe steam and/or hot water coils in counter-flow?

Simply put – no! Circuiting a coil is only necessary to ensure the connections are on the side of the coil that you want. The rows and tubes in the coil dictate how and where you feed, but the steam supply always needs to be the high connection. This method ensures that the leaving condensate is on the bottom of the coil and below the lowest tube within the coil. Whatever else you do, know that the condensate must leave the coil!

If you have any questions or need assistance with ordering and/or installation, please contact a sales engineer at Capital Coil & Air. We will walk with you step-by-step through your entire project should you require any assistance. CALL OR E-MAIL US!  We look forward to the opportunity to work with you on your future projects.


RELATED POSTS

Tips on Hand Designation & Counter-flow

Chilled Water Coils & Moisture Carryover

Chilled Water Coil Circuiting Made Easy