When considering OEM replacement coils, there are multiple reasons why coils can fail prematurely. Sometimes, OEM Coils simply freeze and can never be repaired. Other times, the coil was selected incorrectly, which in turn, made the coil significantly underperform. Many times, there is substantial corrosion or something else in the system that causes the coil to fail. However, most coils, when selected correctly, and in systems that are properly maintained, can last anywhere from 10-30 years! 10-30 years is also a pretty wide range, and there are many variables in how long you can expect a coil to perform. Factors, such as ongoing maintenance, air quality, and water/steam quality all have an effect on a coil’s lifespan.

Reasons Why Coils Fail Of Old Age
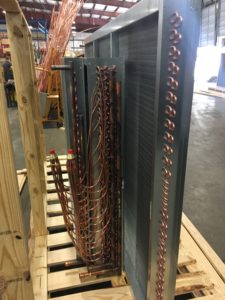
- While the coil’s tubes are considered the primary surface, 70% of all coil performance is performed by the finned area on a coil, which is known as the secondary surface. The fin/tube bond is easily the most important manufacturing feature in any coil. Without the bond between the tubes and fins, the coil could never properly function. Like all things however, over time the fin/tube bond becomes less efficient with constant expansion and contraction. While the construction of the coil, as well as the fin collars, does not allow the fins on the coil to move, that fin/tube bond naturally weakens a coil’s life over time after installation. Because of this, it is not a stretch to say that a coil is easily 30% less efficient after (20) years.
- Cleaning coils often pushes dirt to the center of the coil, and this occurs even more so on wet cooling coils. Just remember that coils can become great air filters if not properly maintained. The BTU output of any coil is in direct proportion to the amount of air going through the coil. If you decrease the CFM by 20%, you are also decrease the BTU’s by 20%!
- Cleaning agents often corrode aluminum fins. Since every square inch of fin surface matters in performance, corrosion of the fin surface is always detrimental to the coil’s performance.
- Many times, there are coil leaks simply because of old age. No coils are immune to erosion. You might find the brazing in the tubes, as well as the brazing in the header/tube connections failing over time. Steam can be both erosive and corrosive under higher pressures. Water travels through the coil at 2 – 5 ft/second, so erosion is an enormous part of coil failure, regardless of how well-maintained. Erosion is always there, whether you realize it or not.
- Water/steam treatment and the corrosive effects of bad steam/water can all be causes of coil failure…which then necessitates the need for a reliable manufacturer for OEM replacement coils.
So What Is The Solution?
Some coils can last 5 years, and some coils can last 30 years. As you have read, there are numerous factors that contribute to a coil’s life. In the end, there will most likely have been multiple attempts to repair that coil to make it last as long as possible. The depressing news is that most of these “Band-Aid” attempts do not work well. The most likely outcome is that you are buying a new coil anyway, so why waste the time and money on a temporary solution?
Coil failure is a “pressure event”, which is a fancy way of saying that a coil is leaking. We’ve listed some of the most common repair methods that you are likely to come across:
- Drop leaking tubes from the circuit: Keep in mind however that every dropped tube reduces the coil’s performance by triple the surface area of the tube that is dropped. Again, while ok in the short-term, this is simply another “Band-Aid” fix. Over time, your energy costs will rise exponentially, and you will probably end up buying a new coil anyway.
- Braze over the existing braze: As mentioned above, erosion has caused the original braze to fail, so all that you are really doing is pushing the pressure to another braze, which will then begin to fail as well.
- High Pressure Cleaning: This method bends the fins, further restricts the airflow, and pushes dirt more to the center of the coil, which can never be adequately cleaned.
The real reason why coils need to be replaced rather than repaired is due to energy costs. If your coil is not operating near desired levels, you’ll need to increase the energy to make it work at its peak performance. Energy increases might be slight at first, but they are guaranteed to continue to rise over time. For example:
- Somebody adjusts the fan drive for higher speeds, higher CFM’s and higher BTU’s.
- Someone adjusts the boiler; the water and steam temperatures are higher.
- Someone adjusts the chiller (1) degree higher for colder water to the chilled water coil.
Whichever method is used, performance begins to suffer and adjustments to the system occur. These adjustments cost energy efficiency and ultimately, money!
If you have ever experienced repairing a coil, then you know it is labor intensive and typically will not work as a permanent solution. With very few exceptions, repairs should be seen as nothing more than temporary until you’re able to replace that coil!
Capital Coil & Air has seen every “repair” method used, as well its inevitable outcome, so instead of putting yourself through that, call Capital Coil and allow us to be your coil replacement experts.
RELATED POSTS
Is Your Quick-ship Shut Down When Needed Most??
Four Things That You Need When Buying Replacement Coils
 Were you aware that